Sie sind nicht angemeldet.

  • »fxline« ist der Autor dieses Themas

Beiträge: 43

Realname: Marco Teodoro

Wohnort: Torres Vedras - Portugal

  • Nachricht senden

1

Dienstag, 25. Februar 2014, 00:12

HTLF 2 Feuerwehr Osnabrück

Is there any time that does not open a topic here, however, I come unto you present the new model that currently under construction is a Mercedes Atego 1529 AF - HTLF 2 the Fire Department of Osnabrück - Germany ( [url]https://www.osnabrueck.de/6739.asp [/ url]) , original vehicle in the picture below and your description.


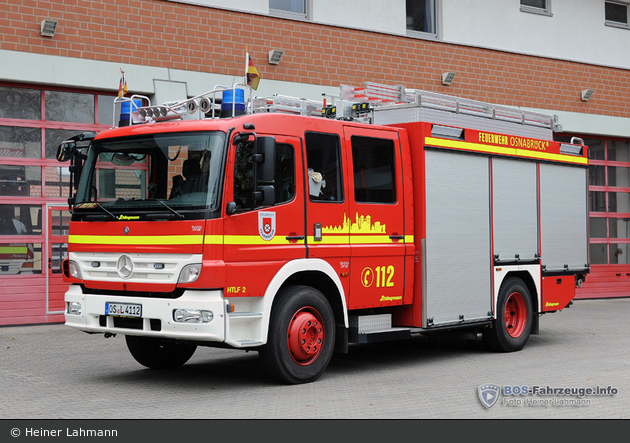
rights image bos-fahrzeuge.inf
Specifications


HTLF 20/22 Fire Department Osnabrück.

Chassis: Mercedes-Benz Atego 1529 AF
Engine power: 210 kW / 286 hp / 282 hp / at 2200 1/min (6 cylinder diesel)
Displacement: 6,374 cc
Maximum speed: 100 kmh
Gross vehicle weight: 16,000 kg
Empty weight: 9710 kg
Load front axle / rear: 6,100 / 10,500 kg
Length w / spool: 7950/8750 mm
Width: 2.500 mm
Height: 3400 mm

Manufacturer Schlingmann Quadra VA

For this model will use as the basis for construction the kit Revell HLF 20/16 ref07525 on the scale: 1/24, from which I will explain all the steps of the construction and try to make a review of the kit.


In the first analysis does seem me that the Revell has been improving the quality of their kits in plastic, soft plastic is easy to cut and does not break to the cut however continue to sin in the details needing some fixes, but we'll see longer there forward, now proceeded to the actual construction.
The next step is to a test the fittings to Parts and verify its defects and as we can see by the motor the slots are good, but the details are very poor what do I have to change, add, with some to scratch to get a more realistic motor and in this case was hard to get photos of the engine of this vehicle, although it has managed one, but not very clear what I had to use pictures of other models Atego engines and chose what seemed to me the closest of the unfocused picture and therefore also I opted for escolhar some accessories to my junk and put some pieces that I have kept and separated the engine from the gearbox and the result was this;


Motor was completed the beginning given to the chassis and has already been easier, because there is immense references and notches on kit are perfect and the details are very good what makes it fairly easy the work, however I had to make an correction the exhaust system, because the system is different from the original vehicle that come in the kit.


Chassis ready it's time to give bath theat the pieces and begin painting with a primary and then painting, here's the result;


Finished painting.


For now is all, hope you like ...

2

Dienstag, 25. Februar 2014, 18:28

Hello Marco,

very good work! What you have built so far looks great!

Why did you choose a german fire truck from Osnabrück? Do you have any connections to Germany?

Best greetings
Henning
Kritik ist Lob an jemandem, dem man mehr zutraut

  • »fxline« ist der Autor dieses Themas

Beiträge: 43

Realname: Marco Teodoro

Wohnort: Torres Vedras - Portugal

  • Nachricht senden

3

Mittwoch, 26. Februar 2014, 00:03

Hello Henning,
Thanks for the comment. connection to Germany, but have with the fire department of Boblingen where I have great friends and the choice of truck Osnabruck, was a great friend of mine and I'm building for him.

4

Mittwoch, 26. Februar 2014, 09:26

Hey

Wow thats nice. The Friend from my Boyfriend build the fire Brigade Cars from Osnabrück in 1:87, but in 1:24 is another matter ;)

  • »fxline« ist der Autor dieses Themas

Beiträge: 43

Realname: Marco Teodoro

Wohnort: Torres Vedras - Portugal

  • Nachricht senden

5

Mittwoch, 26. Februar 2014, 13:23

Thanks for the comment!

Well, following the project to the analyze reference photos I have, I noticed that the mudguards that come in the kit has some differences we I had to fix, including the stirrups, that comes in the kit are for 4x4 Atego models and here notes be perfectly well that Revell did not attempt follow references for the models that present in the manual, but a standart kit to give to 4x2 and 4x4 models, as you can see in the photos;


Stirrups that come in the kit


The correction.


Starting the cabin had a problem that it was not be reference photos and I sent an email to the fire department asking for me to make available some picture, but unfortunately I did not get any answer what I tried the manufacturer and to my amazement I was provided some references to various interior that model and so I noticed I had more work to do, starting with the supports of the breathing appliances that comes with some very weak details where they can observe in the photos, breathing devices comes only to halves and are visible from the front of model which makes it a bit ugly and in this case I had to build everything from scratch, as well as breathing devices.


Support kit


The correction.


breathing appliances


Following a series of corrections, follows the stirrups of the rear doors of the cabin where I had virtually build them from scratch, taking small parts kit.


The correction.


The car roof I opted to to cut the interior lights and I'll apply a few lights in resin and I will show later, also I changed the floor, doors and seats cabin applying a "slip resistant" the plate.
Hope you enjoy the work and now plays in the bath to follow for the primary and final painting.

Car roof;


Interior ready.


it was time to paint the interior with the references that I have from the manufacturer, although it may not to be the correct due to which practically all of the vehicles of fire department when they are delivered after some amendments are applied in your interior, do not know if this is the case, but here gets what was done.


Hope you like it and now it is time to start the cabin.

  • »fxline« ist der Autor dieses Themas

Beiträge: 43

Realname: Marco Teodoro

Wohnort: Torres Vedras - Portugal

  • Nachricht senden

7

Donnerstag, 27. Februar 2014, 12:16

Danke! :ok:

Beiträge: 275

Realname: Michael

Wohnort: Geislingen/BL

  • Nachricht senden

8

Donnerstag, 27. Februar 2014, 16:48

Hey Marco,
great work you show us. It looks very great!
I look forward to your next steps.
Nukular, das Wort heißt Nukular!! :lol:

Beiträge: 1 441

Realname: Patrick

Wohnort: Sandersdorf-Brehna

  • Nachricht senden

9

Donnerstag, 27. Februar 2014, 19:35

Hi Marco,

Look your construction progress more light very well. You try a lot of trouble with the detailed elaboration. :ok:

The modified breathing apparatus like really very good to me, could you tell me how you changed this?

I have the HLF on under construction, but for me the increased construction already since almost 2 years.

I'm already looking forward to the next update.

it greets Patrick :wink:
Aktuell im Bau: HLF 20/16 Beleuchtet u. Mercedes Benz
Auf der Warteliste: Simba 8x8, TLF 16/25

Beiträge: 76

Realname: Pavel Amrich

Wohnort: Nitra, Slowakei

  • Nachricht senden

10

Freitag, 28. Februar 2014, 15:59

Hi Marco... you make very good job on this classic. Great. Pavel.

  • »fxline« ist der Autor dieses Themas

Beiträge: 43

Realname: Marco Teodoro

Wohnort: Torres Vedras - Portugal

  • Nachricht senden

11

Freitag, 28. Februar 2014, 19:43

Thank you all for your support!
Hi Marco,

Look your construction progress more light very well. You try a lot of trouble with the detailed elaboration. :ok:

The modified breathing apparatus like really very good to me, could you tell me how you changed this?

I have the HLF on under construction, but for me the increased construction already since almost 2 years.

I'm already looking forward to the next update.

it greets Patrick :wink:

Hello Patrick,
Thank you for comment, the respiratory system was built to scratch and built one in a mold and resin copies made​​, however the original was built with evegreen listing ref. 230, the tops were covered with evegreen plate 2mm and sanded the tops to have the form, unfortunately do not have photos of step by step.
If you need, I can make it and send you.

Best regards

Beiträge: 1 441

Realname: Patrick

Wohnort: Sandersdorf-Brehna

  • Nachricht senden

12

Samstag, 1. März 2014, 19:02

Hi Marco,

Your one offering the earlier step by step guide I like to take on.

You can also write it like here in the post so that others can see how you built the respirators.

it greets Patrick :wink:
Aktuell im Bau: HLF 20/16 Beleuchtet u. Mercedes Benz
Auf der Warteliste: Simba 8x8, TLF 16/25

  • »fxline« ist der Autor dieses Themas

Beiträge: 43

Realname: Marco Teodoro

Wohnort: Torres Vedras - Portugal

  • Nachricht senden

13

Samstag, 5. April 2014, 01:47

upgraded 05-04-2014

Thank you guys for the support and my apologies for not having posted anything sooner but time, this moment is what I lack.

Initiating the cabin I observed that practically I will have to make few changes, and this cabin comes with very good details and little things we will have to alter, however there is always anything we can improve and refine the model to closely to the original.


Let us begin by eliminate chromed that come in the kit, as these are nothing realists, chromed eliminated is time to build the structure which supports the trumpets of two tones and lights.


This model also comes with the grill closed and applications for front strobs and in this case I opted to eliminate that and put a grill network, in the case of side mirrors also I opted for eliminating the frame and put a four mirror.


The structure that comes in the kit has reasonable applications, in which I had of having some care in the construction although necessitated some putty, I also had to make many changes one of which was cut about 3mm at the top so that it looks identical to the original.


Completed structure is time to continue all the details of this model, starting with the monitor I suppose exists (alleged because I'm not sure whether there is but assessed by a photo I have, but that is blurred which seems to me exist that this monitor is identical others vehicles from the same fire department) and followed was built the boxes that exist at the top supporting ladders.


Well my friends, the moment of truth arrived, the painting.


My friends, painting completed is time of drawing the decals and thereby to complete the model, I hope you enjoyed.

Beiträge: 349

Realname: Lukas

Wohnort: Fischbachtal

  • Nachricht senden

14

Samstag, 5. April 2014, 02:10

Hi Marco,

your Atego looks very good. :ok:

Regards Lukas :wink:
Mercedes NG und SK, einfach tolle Laster !!! :thumbup:
Im Bau:
Mercedes NG 2222 Silolaster Fertig: VW LT 28 in 1 87 Mehr hier

15

Samstag, 5. April 2014, 06:14

Hallo Marco,

sehr schöne Baufortschritte, das sieht klasse aus! :ok:

Schöne Grüße
Henning
Kritik ist Lob an jemandem, dem man mehr zutraut

  • »fxline« ist der Autor dieses Themas

Beiträge: 43

Realname: Marco Teodoro

Wohnort: Torres Vedras - Portugal

  • Nachricht senden

16

Mittwoch, 9. April 2014, 15:12

Finished

Muito Obrigado POR SEUS comentários Dar.
BEM MEUS amigos, Os Adesivos FORAM concebidos e Aplicados nenhum Modelo EO Resultado was este, e ASSIM POR dou Este Modelo Terminado. Para ABRACO, comeu um Proxima.


17

Mittwoch, 9. April 2014, 15:19

Very fine. Whe want more. :five: :respekt: :respekt: :respekt:

Pit

Beiträge: 275

Realname: Michael

Wohnort: Geislingen/BL

  • Nachricht senden

18

Mittwoch, 9. April 2014, 15:43

Great!!! One of the best "Revell Schlingmann" I ever saw!
I' m really impressed!!
Nukular, das Wort heißt Nukular!! :lol:

Beiträge: 349

Realname: Lukas

Wohnort: Fischbachtal

  • Nachricht senden

19

Mittwoch, 9. April 2014, 22:00

Hi Marco,

the Mercedes looks very good. Fine. :ok:

Regards Lukas :wink:
Mercedes NG und SK, einfach tolle Laster !!! :thumbup:
Im Bau:
Mercedes NG 2222 Silolaster Fertig: VW LT 28 in 1 87 Mehr hier

Ähnliche Themen

Werbung